Jun 28, 2024
A Beginner's Guide to REST APIs: Creating Your First ExpressJS API
REST API ExpressJS NodeJS
A Beginner’s Guide to REST APIs: Creating Your First ExpressJS API
As you embark on your coding journey, you’ll encounter APIs quite often. APIs, or also known as Application Programming Interfaces, are a vital part of modern web development, or software development in general. By the end of this blog post, you’ll have a better understanding of REST APIs, a widely used type of API architecture, and you will also have created your first REST API using ExpressJS.
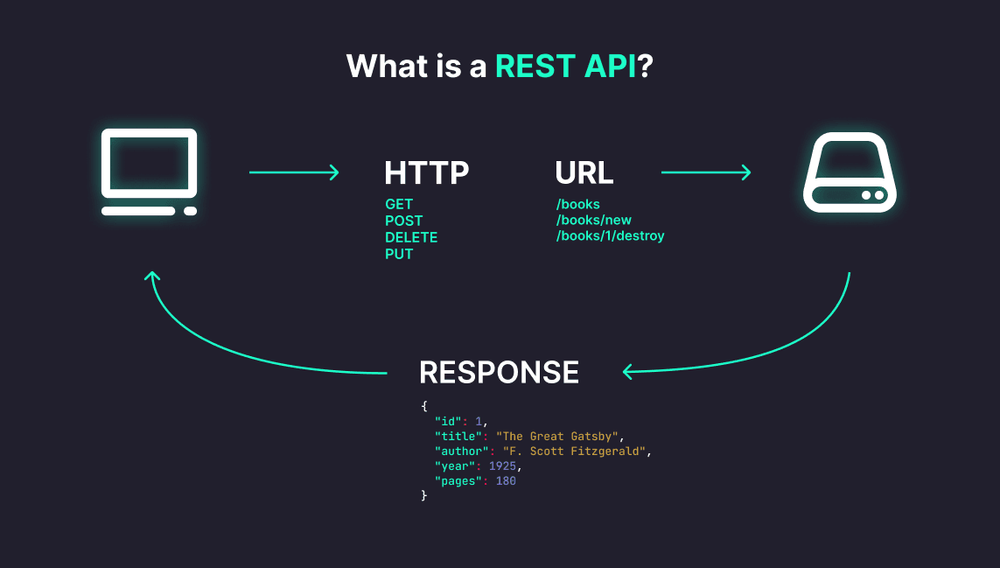
What is a REST API?
REST, which stands for Representational State Transfer, is a way of designing networked applications. With REST APIs, you can access and change data via HTTP requests. RESTful APIs follow certain rules that allow them to be scalable, easy to maintain, and efficient.
Here are some key principles of REST APIs:
- Stateless: Each request from a client (e.g. your web browser) to a server must contain all the information needed to understand and process the request. The server doesn’t store any state about the client session on the server side. Instead, the session state is stored on the client side.
- Cacheable: Clients can cache responses from the server, which helps improve performance.
- Client-Server: The client and the server are separate entities that communicate via HTTP requests, allowing each other to evolve separately.
Now that we’ve covered the basics of REST APIs, let’s create our first REST API using ExpressJS.
Creating Your First REST API
Before we begin, make sure that you have Node.js and npm (Node Package Manager) installed on your computer. You can download Node.js here. Once you have Node.js installed, you can check if you have both Node.js and npm installed by running the following commands in your terminal:
bashnode -v # output: v14.15.4npm -v# output: 6.14.10If you see a version number for NodeJS and npm, then you’re good to go! (Note: Your version numbers may be different from the ones above depending on when you’re reading this blog post.)
Step 1: Creating your project
- Create a new folder for your product and navigate to it in your terminal or command prompt.
- Run
npm init -yto initialize your project and create apackage.jsonfile with default settings. - Run
npm install expressto install ExpressJS in your project.
Step 2: Creating your ExpressJS server
- Create a new file called
index.jsin your project folder. - Open the file in your text editor of choice to import ExpressJS and create a new instance of the Express application.
const express = require('express');
const app = express();
Step 3: Defining your route
Routes define how your API will respond to specific HTTP requests. For this example, we’ll create a simple route returning a greeting message.
- Add the following code to your
index.jsfile:
app.get('/greeting', (req, res) => {
  res.send('Hello, world! This is my first REST API! 🥳');
});
This code defines a new route for the /greeting endpoint that will responsd to GET requests.
When a user visits the your-domain.com/greeting endpoint, the server will respond with the message Hello, world! This is my first REST API! 🥳.
The get() method defines a route for the GET HTTP request. The first argument is the path of the route, which in this case is /greeting.
The second argument is a callback function that takes in two parameters: req and res. req is the request object, containing information about the HTTP request sent.
The res object is the response object, which contains information about the response that will be sent back to the client.
Step 4: Starting up your server
Now it’s time to start up your server for the first time and see your API in action.
- We now need to tell our server to listen for requests on a specific port. Add the following code to your
index.jsfile:
const PORT = 3000;
app.listen(PORT, () => {
  console.log(`Server listening on port ${PORT}`);
});
The listen() method takes in two arguments: the port number and a callback function. The callback function will be executed when the server starts up. In this case, we’re logging a message into our console to know that server has started and is listening for requests on port 3000.
You may also use the process.env.PORT variable to listen on the port defined in your environment variables. You may need to do this if you’re deploying your app to a hosting service like Railway.app as they will assign a port number for you.
Step 5: The step you’ve been waiting for… finally testing your API!
You’ve made it this far! Now it’s time to test your API to make sure it’s working and to see the fruits of your labor.
- Run
node index.jsin your terminal to start up your server. - Open your web browser of choice and go to
localhost:3000/greeting(or if you specified a different port in yourPORTvariable) - You should see the following message:
Hello, world! This is my first REST API! 🥳
Alternatively, you may use a tool like Postman to test your API. Postman allows you to send various types of HTTP requests and inspect the responses. And is a great tool to have in your developer toolkit.
- Download and install Postman from the Postman website.
- Open Postman and create a new GET request.
- Enter
localhost:3000/greetingas the request URL and click the Send button. You should see the same message as before.
Congratulations! You’ve successfully created and tested your first REST API using ExpressJS. 🎉
Wrapping Up
In this beginner-friendly blog post, you learned about REST APIs and how to create your very own REST API using ExpressJS. With this foundation, you can continue to learn and build more complex APIs to power your applications.Remember, practice makes perfect. So, keep on exploring and experimenting with different routes, request methods, and data formats to enhance your understanding of REST APIs and ExpressJS. Happy coding! 🚀